
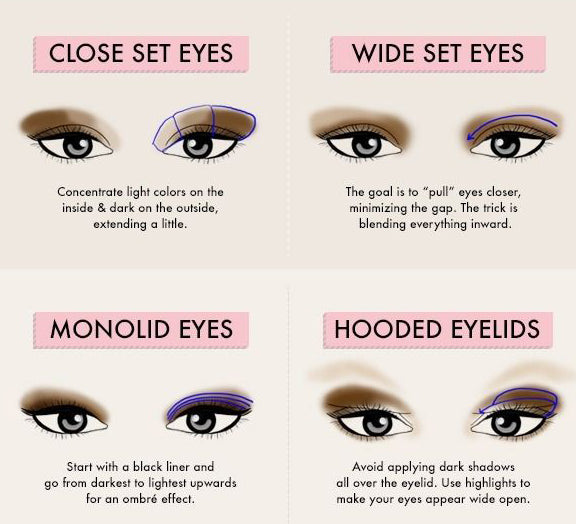
When it comes to applying eyeshadow for hooded eyes, beginners often find themselves facing a unique challenge. Hooded eyes refer to a specific eye shape where the crease of the eyelid is not easily visible when the eyes are open. This can make it difficult to showcase eyeshadow colors and create depth. However, with the right techniques and tips, anyone can master the art of applying eyeshadow to enhance hooded eyes and make them pop.
To apply eyeshadow for hooded eyes, it is crucial to focus on creating dimension and a lifted effect. One effective method is to use a combination of light and dark shades to define and highlight different areas of the eyes. Applying a lighter shade on the inner corner and under the brow bone can help create the illusion of a larger eyelid space. Then, using a darker shade in the crease and outer corner can add depth and definition. By blending these shades seamlessly, you can create a beautiful eye look that accentuates your unique eye shape.
To apply eyeshadow for hooded eyes as a beginner, follow these steps:
- Start by priming your eyelids to create a smooth base.
- Choose matte shades for the crease to add depth and dimension.
- Apply a lighter shade on the lids to make them appear more prominent.
- Blend a darker shade on the outer corners to create a lifted effect.
- Highlight the brow bone and inner corners with a light, shimmery shade.
Remember to blend well and keep the focus on the center of the eyelids to prevent the shadow from disappearing. Happy experimenting!
How to Apply Eyeshadow for Hooded Eyes for Beginners
Are you a beginner struggling to apply eyeshadow on your hooded eyes? Don’t worry! We’ve got you covered. In this article, we will guide you through the process of applying eyeshadow specifically for hooded eyes. With the right techniques and tips, you can enhance your eye shape and create stunning eye looks. Let’s get started!
Understanding Hooded Eyes
Before diving into the application techniques, it’s important to understand what hooded eyes are. Hooded eyes have a fold of skin that droops over the crease, making the eyelid appear smaller. This can make traditional eyeshadow techniques less effective, as the color tends to get hidden when the eyes are open.
However, with the right application methods, you can create the illusion of larger, more defined eyes. Let’s explore some tips and techniques for applying eyeshadow for hooded eyes.
Prepping and Priming
Before applying eyeshadow, it’s important to prep and prime your eyelids. This helps the eyeshadow adhere better and prevents creasing throughout the day. Follow these steps:
- Start by cleansing your eyelids and applying a moisturizer or eye cream.
- Next, apply an eyeshadow primer or a concealer that matches your skin tone. This creates a smooth base and helps the eyeshadow adhere better.
- Blend the primer or concealer using your fingertips or a brush.
- Set the primer with a translucent or matte eyeshadow powder to prevent creasing.
Choosing the Right Eyeshadow Shades
For hooded eyes, it’s important to choose the right eyeshadow shades that will enhance your eye shape. Here are some tips:
1. Matte Shades: Opt for matte eyeshadows for the crease area. These shades create depth and definition without emphasizing the hoodedness.
2. Shimmer Shades: Use shimmer or metallic shades on the mobile lid to draw attention and create a brightening effect.
3. Inner Corner Highlight: Apply a light, shimmery eyeshadow to the inner corner of your eyes to make them appear more open.
4. Neutral Base: Start with a neutral base shade that matches your skin tone to create a seamless transition between the eyeshadow colors.
Remember, these are general guidelines, and you can experiment with different shades to find what suits you best.
Techniques for Applying Eyeshadow on Hooded Eyes
To make the most of your hooded eyes, try the following techniques:
1. Transition Shade
Start by applying a transition shade in the crease area. This shade should be a few shades darker than your skin tone. Use a fluffy blending brush to apply the shadow in windshield wiper motions to create a seamless transition.
Blending is key to achieving a natural gradient effect. Make sure to blend out any harsh lines for a soft and well-defined crease.
2. Outer V Shade
To add depth and definition to your hooded eyes, apply a slightly darker shade to the outer V area of your eyelids. This creates the illusion of a lifted and more elongated eye shape.
Using a smaller, tapered brush, focus the darker eyeshadow on the outer corner and blend it slightly into the crease. This will create a subtle smoky effect.
3. Lid Shade
Apply your chosen lid shade on the mobile lid area, focusing on the center. Use a flat eyeshadow brush or your fingertip for maximum color payoff.
Avoid extending the eyeshadow beyond the hooded area, as this can make the eyes appear even smaller.
4. Inner Corner and Brow Bone Highlight
Apply a light, shimmery eyeshadow to the inner corner of your eyes to create a brightening effect. This will make your eyes appear larger and more awake.
Similarly, apply a matte or satin eyeshadow shade slightly lighter than your skin tone to the brow bone. This will highlight and lift the area, giving the illusion of a higher crease.
Finishing Touches and Tips
Here are some additional tips to keep in mind when applying eyeshadow for hooded eyes:
- Use a waterproof or long-lasting eyeshadow formula to prevent smudging or transferring.
- Avoid heavy eyeliner on the upper lash line, as it can make the hoodedness more prominent. Instead, opt for a thin line or a soft, smudged effect.
- Curl your lashes to open up your eyes and complement your eyeshadow look.
- Apply mascara to both the upper and lower lashes to balance the overall eye appearance.
- Experiment with different eyeshadow techniques and colors to discover what works best for your unique eye shape.
How to Make Your Hooded Eyes Stand Out
Now that you know how to apply eyeshadow for hooded eyes, you can take it a step further and make your eyes stand out. Here’s how:
1. Experiment with Winged Eyeliner: Winged eyeliner can elongate your eyes and create a captivating look. Try different wing shapes to find the one that suits you best.
2. Use False Lashes: False lashes can instantly lift your hooded eyes and add drama to your overall look. Opt for lashes with longer fibers at the outer corners to create a winged effect.
3. Define Your Brows: Well-groomed and defined eyebrows can frame your hooded eyes and add structure to your face. Fill in any sparse areas and shape your brows to enhance your eye shape.
Key Takeaways – How to Apply Eyeshadow for Hooded Eyes for Beginners
- Start by applying a primer to create a smooth and even base for your eyeshadow.
- Use matte shades for the crease to add depth and dimension to your hooded eyes.
- Apply a shimmery shade on the center of your eyelid to make your eyes appear larger and more open.
- Use a small brush to apply eyeshadow on your lower lash line to create a balanced look.
- Blend your eyeshadow well to ensure a seamless transition between colors.
Frequently Asked Questions
Here are some commonly asked questions about applying eyeshadow for hooded eyes for beginners:
1. What is the best eyeshadow technique for hooded eyes?
The best eyeshadow technique for hooded eyes is to create a transition shade on the crease to add depth. Apply a light shade on the lid and a darker shade on the outer corner to create dimension. Make sure to blend well to avoid harsh lines. Additionally, using shimmery shades on the center of the lid can help make the eyes appear more open.
For hooded eyes, it’s also important to focus on the upper eyelid as it is more visible when the eyes are open. Apply a matte shade on the upper lid and extend it slightly above the crease to create the illusion of a larger eyelid space.
2. Should I use primer before applying eyeshadow on hooded eyes?
Using an eyeshadow primer is highly recommended before applying eyeshadow on hooded eyes. The primer will help create a smooth and even base, preventing the eyeshadow from creasing or smudging. It also enhances the color payoff and longevity of the eyeshadow.
Make sure to apply the primer all over the eyelid, including the hooded area, for a seamless look. Allow the primer to set for a minute or two before starting with your eyeshadow application.
3. What are some recommended eyeshadow colors for hooded eyes?
When it comes to eyeshadow colors for hooded eyes, it’s best to opt for shades that create contrast and depth. Neutrals like browns, taupes, and warm tones work well for everyday looks. Darker shades like deep purples, navy blues, and charcoal greys can add drama and intensity for special occasions.
Experimenting with metallic and shimmery shades on the lid can also help draw attention to the eyes. However, avoid using too much shimmer on the hooded area to prevent emphasizing the hoodedness. Remember to always blend the colors well for a seamless finish.
4. How can I make my hooded eyes appear more open?
To make hooded eyes appear more open, there are a few techniques you can try. Firstly, applying a light, matte shade on the upper lid can help create the illusion of a larger eyelid space. Extend the shade slightly above the crease to make the eyes look more open and awake.
Using a white or nude eyeliner on the waterline can also make the eyes appear bigger and brighter. Curling the lashes and applying mascara to both the upper and lower lashes can further enhance the openness of the eyes.
5. Are there any specific brushes or tools that work best for applying eyeshadow on hooded eyes?
For applying eyeshadow on hooded eyes, there are a few brushes and tools that can be helpful. A fluffy blending brush is essential for seamless blending and creating a smooth transition shade on the crease.
A small, compact brush is great for applying darker shades on the outer corner or in the crease. Using a smudge brush can help blend and diffuse the colors for a soft and blended look.

To apply eyeshadow for hooded eyes as a beginner, start by using a neutral eyeshadow color on your lids to create a base. Then, apply a medium-toned shade on the crease of your eye to add depth. Next, use a darker eyeshadow color on the outer corner of your eyelid to create a lifted effect.
Remember to blend the colors well for a seamless look. Additionally, using shimmery eyeshadows on the center of your lid can help to make your eyes appear bigger. To finish, apply mascara to your lashes for added definition and complete the look.


Leave A Comment