Welcome to the world of smokey eyes, where sultry elegance meets captivating allure. Mastering the art of a smokey eye can seem daunting, but fear not, for I am here to guide you through the process. With a few expert tips and tricks, you’ll be creating mesmerizing, smoldering eyes that will turn heads wherever you go.
Let’s delve into the essentials of a smokey eye. This iconic makeup look dates back centuries and has been embraced by countless fashion icons and celebrities. The key lies in the careful blending of deep, intense eyeshadow shades to create a gradient effect, with the focus on the subtly smudged liner and the perfectly smoked-out outer corners of the eyes. Enhancing your natural eye shape and defining your lashes will help complete the glamorous smokey look. So, get ready to unlock the secrets of this timeless beauty trend.
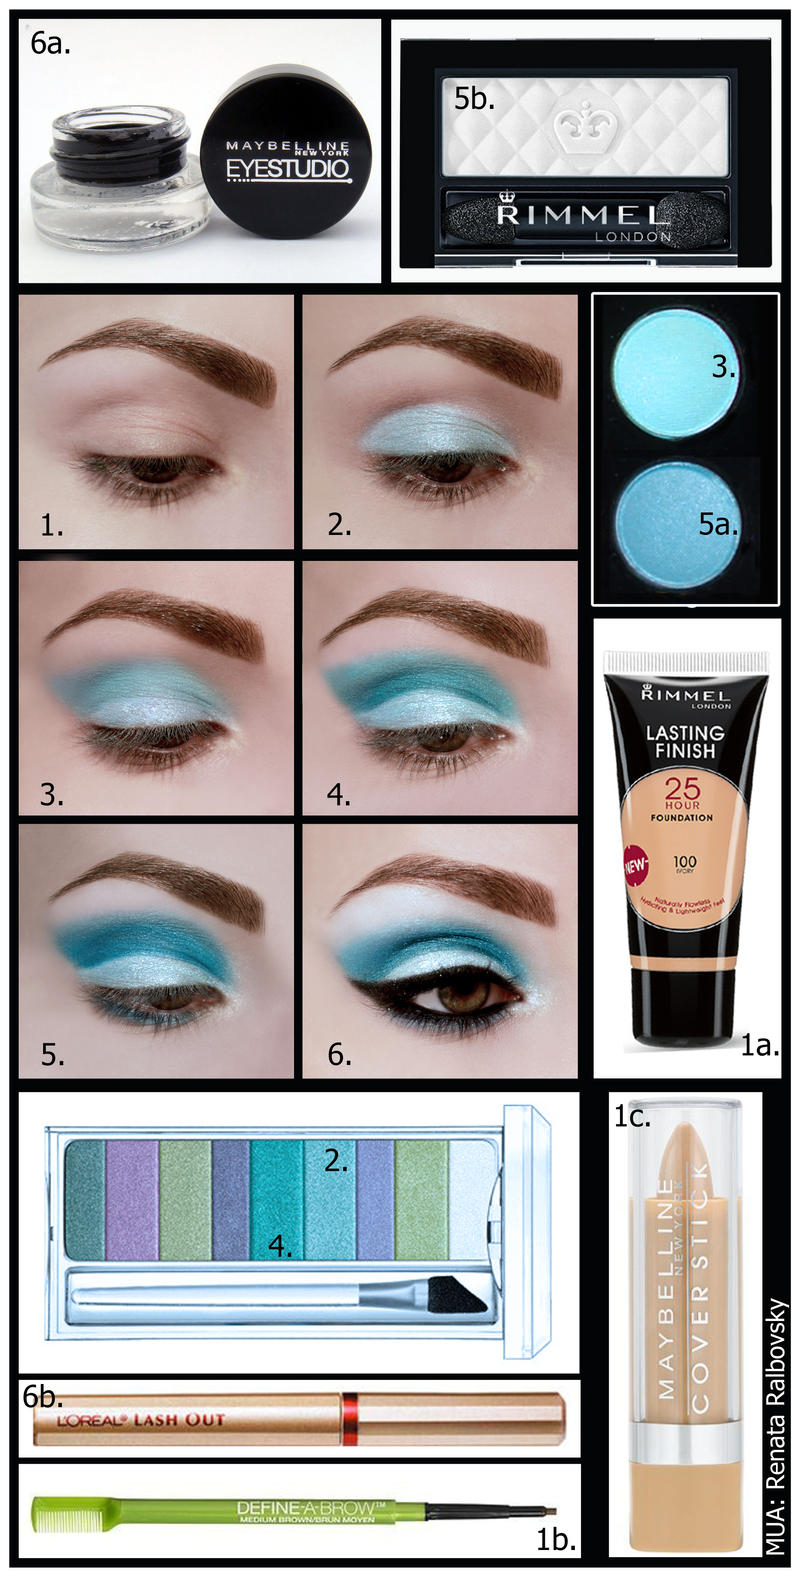
Achieve a stunning smokey eye look with these professional tips. Start by applying a neutral eyeshadow all over the lid. Next, add a deeper shade to the crease for dimension. Use a smudging brush to blend a darker shade along the upper and lower lash lines. Finish with black eyeliner and mascara for intensity. Remember to blend well for a seamless effect. Enhance your eyes and make a bold statement with a perfectly executed smokey eye.


The Art of Creating a Stunning Smokey Eye
Creating a smokey eye look is a classic and timeless technique that adds drama and intensity to any makeup look. The smokey eye is a versatile style that can be tailored to suit various occasions and preferences, whether you want a soft, natural look or a bold, sultry effect. By mastering the art of a smokey eye, you can elevate your makeup skills and create stunning eye looks that are sure to turn heads.
Before diving into the step-by-step process of creating a smokey eye, it’s important to understand the key elements that contribute to a successful look. The smokey eye involves using different shades of eyeshadow to create a gradient effect that transitions from a lighter color on the inner corner of the eye to a darker color on the outer corner. Blending is crucial in achieving a seamless and professional finish, so be sure to have high-quality blending brushes on hand.
It’s also essential to choose the right color palette for your smokey eye. While the traditional black and gray hues are popular choices, you can experiment with various colors, such as browns, purples, or even blues, to create unique and eye-catching looks. Remember to consider your skin tone and eye color when selecting shades to enhance your natural features.
Prepping the Eyelids: Prime and Set
The first step in creating a flawless smokey eye is to prep the eyelids. Start by applying an eyeshadow primer to ensure that the eyeshadow stays in place and lasts longer throughout the day or night. The primer creates a smooth canvas for the eyeshadow, preventing creasing and smudging. Choose a primer that matches your skin tone for a seamless finish.
Once the primer is applied, set it with a translucent or skin-toned eyeshadow powder. This step helps to prevent any sticky texture and enhances the blending of the eyeshadow. Simply dust a small amount of powder over the primed eyelids using a fluffy brush or blending sponge.
By prepping the eyelids with a primer and setting powder, you create a smooth and even base, allowing the eyeshadow to adhere better and blend more seamlessly.
Defining the Crease: Transition and Depth
The next step is to define the crease of the eye, which adds depth and dimension to the smokey eye look. Start by selecting a transition shade, which is a medium-toned eyeshadow that will serve as a bridge between the lid color and the deeper crease shades. Apply the transition shade to the crease area using a fluffy blending brush in windshield-wiper motions.
Ensure that the transition shade is blended seamlessly into the skin, softening any harsh lines. This creates a gradient effect that seamlessly transitions from the lid color to the crease shade.
Next, choose a deeper shade to add depth and intensity to the crease. This shade should be darker than the transition shade and can be a cool-toned or warm-toned color depending on your preference and the overall look you want to achieve. Apply the deeper crease shade to the outer V of the eye, which is the area where the eyelid meets the brow bone. Use a smaller, more precise blending brush for more control and precision.
Blend the deeper shade into the crease, focusing on the outer corner of the eye, to create a gradient effect that adds dimension and drama. Be sure to blend thoroughly to avoid any harsh lines or patches of color.
Intensifying the Lid: Highlights and Shimmers
The lid is the focal point of a smokey eye look, and it’s where you can get creative and add a pop of color or shimmer. Start by applying a lighter shade to the inner corner of the eye, which serves as a highlight to brighten and open up the eyes. This can be a shimmery, champagne tone or a matte light shade, depending on the desired effect.
Then, choose a darker shade for the center and outer portion of the lid. This shade should be the darkest color in the smokey eye palette and can be a matte or shimmery finish. Apply the darker shade to the lid using a flat eyeshadow brush or your finger for maximum color payoff.
Ensure that the lid color blends seamlessly with the transition and crease shades, creating a gradient effect. Use a blending brush to soften any harsh lines and blend the shades together for a seamless transition.
If you want to add an extra touch of glamour to your smokey eye, you can apply a shimmery shade to the center of the lid, creating a spotlight effect. This adds dimension and draws attention to the center of the eye. Use a small, flat eyeshadow brush or your fingertip to apply the shimmer shade to the desired area.
Finishing Touches: Eyeliner and Mascara
To complete the smokey eye look, it’s important to define the eyes with eyeliner and enhance the lashes with mascara. Choose a black or dark brown eyeliner to line the upper and lower lash lines, creating definition and intensifying the smokey effect. You can create a precise line or smudge it out for a smokey, smudged effect.
Once the eyeliner is applied, finish off the look with several coats of mascara to volumize and lengthen the lashes. Curl the lashes before applying mascara for maximum impact. Wiggle the mascara wand from the roots to the tips of the lashes to ensure even distribution and avoid clumping.
Finally, clean up any fallout from the eyeshadow application using a gentle makeup remover or micellar water. This will ensure that your smokey eye look appears clean and polished.
Take Your Look to the Next Level with These Tips
Creating a beautiful smokey eye requires practice and experimentation. Here are some additional tips to elevate your smokey eye game:
1. Blend, Blend, Blend
One of the most crucial aspects of a flawless smokey eye is blending. Take your time to blend the eyeshadow shades thoroughly, ensuring a seamless transition from light to dark. Use a clean blending brush or a clean finger to soften any harsh lines and create a gradient effect.
Remember, the key to a smokey eye is a seamless and professional finish, so don’t rush the blending process.
2. Experiment with Color
The traditional black and gray smokey eye is undeniably stunning, but don’t be afraid to experiment with different colors. Try incorporating shades of brown, purple, or even bold blues for a unique and eye-catching look. Consider your skin tone and eye color when selecting shades to enhance your natural features and make your eyes pop.
3. Start Light, Then Build
If you’re new to creating a smokey eye, it’s best to start with lighter shades and gradually build up the intensity. This allows you to have better control over the application and prevents the colors from becoming too overwhelming. Start with a soft transition shade and slowly build up to a deeper crease shade and a bolder lid color.
4. Consider Eye Shape
Take your eye shape into consideration when creating a smokey eye. Certain techniques may enhance or alter the appearance of your eye shape. For example, if you have hooded eyes, focusing the darkest shade on the outer corner can create the illusion of a lifted eye. Experiment with different techniques to find what works best for your unique eye shape.
5. Play Up Other Features
When creating a bold and intense smokey eye, it’s important to balance the rest of your makeup. Opt for neutral lips and a natural-looking complexion to let your eyes take center stage. Alternatively, if you want to create a full-glam look, feel free to experiment with bolder lip colors and contouring.
Enhance Your Look with a Stunning Smokey Eye
A smokey eye is a versatile and captivating makeup look that can elevate any style or occasion. By following these steps and tips, you can master the art of creating a stunning smokey eye that enhances your natural beauty and adds a touch of glamour to your look.
Remember to practice, experiment with different colors, and have fun with your makeup. With time and patience, you’ll become a smokey eye pro and be able to create mesmerizing eye looks that leave a lasting impression.
So go ahead, embrace the smokey eye trend and unleash your inner makeup artist!
For more makeup inspiration, beauty tips, and product recommendations, check out Beauty Store for You.
Frequently Asked Questions
The following are some common questions about how to achieve a smokey eye look with makeup.
1. How do I choose the right eyeshadow colors for a smokey eye?
When selecting eyeshadow colors for a smokey eye, it’s essential to consider your eye color and skin tone. For a classic smokey eye, opt for neutral shades such as grays, browns, and blacks. However, you can also experiment with more vibrant colors like purples and blues for a unique twist.
Remember to incorporate a mix of matte and shimmer finishes for added dimension. The key is to select shades that complement each other and create a seamless gradient from light to dark.
2. What tools do I need to achieve a smokey eye?
To achieve a flawless smokey eye, you’ll need a few essential tools:
– A set of high-quality eyeshadow brushes, including a fluffy blending brush, small precision brush, and flat shader brush.
– An eyeliner pencil or gel eyeliner for creating a smudged or defined eyeliner look.
– An eyelash curler and mascara to add volume and length to your lashes.
3. How do I create a smokey effect on my lower lash line?
To create a smokey effect on your lower lash line, you can follow these steps:
1. Apply a dark eyeshadow shade along the lower lash line using a small precision brush.
2. Use a clean blending brush to soften and blend the eyeshadow, creating a smudged effect.
3. To intensify the look, apply a touch of eyeliner or smudge the existing eyeliner on your lower lash line.
4. How can I make my smokey eye last longer?
To make your smokey eye last longer, follow these tips:
– Use an eyeshadow primer before applying any eyeshadow to create a smooth base and enhance the longevity of your eye makeup.
– Set your eyeshadow with a translucent powder to prevent creasing and smudging throughout the day.
– If you have oily eyelids, consider using a waterproof eyeshadow formula or setting spray for added staying power.
5. Can I wear a smokey eye during the day?
Absolutely! While smokey eyes are often associated with evening or special occasions, you can still wear a toned-down version during the day. Opt for softer shades like taupes or light browns, and blend them out for a more subtle effect.
Remember to keep the rest of your makeup minimal and fresh, focusing on natural-looking skin and soft lip colors to balance the intensity of the smokey eye.
To achieve a smokey eye look, start by applying a neutral eyeshadow as a base all over your lid. Then, choose a darker eyeshadow shade, such as black or charcoal, and apply it to the outer corner of your eye, blending it inward. Make sure to blend well for a seamless transition between shades.
Next, apply a medium eyeshadow shade in the crease of your eyelid to add depth. Use a blending brush to blend the colors together for a soft and smokey effect. To enhance the look, line your upper and lower lash lines with a black eyeliner pencil, smudging it slightly.


Leave A Comment