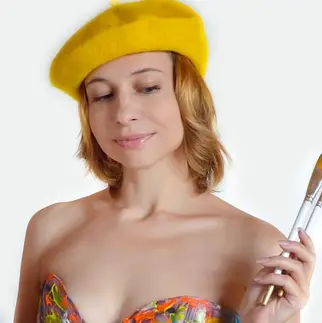
When it comes to photoshoot makeup, there’s a lot more than meets the eye. A professional makeup artist knows that perfecting the look for the camera requires expert techniques and knowledge. It’s not just about creating a flawless face, but also understanding how colors, lighting, and photography can affect the final result. So, how exactly do you achieve that picture-perfect makeup for a photoshoot? Let’s dive in and explore the art of photoshoot makeup.
Photoshoot makeup is all about enhancing features and ensuring they stand out on camera. It requires a careful balance between natural and glamorous, as makeup needs to be noticeable without overpowering the subject. One important aspect of photoshoot makeup is understanding the different looks required for various types of shoots, whether it’s fashion, beauty, or editorial. Additionally, having knowledge of color theory and how different pigments can enhance certain features can make all the difference in creating stunning photos.
Creating a flawless photoshoot makeup look requires careful planning and execution. Start with a clean, moisturized face, then apply a primer to create a smooth canvas. Use a high-coverage foundation to even out your skin tone and conceal any imperfections. Define your features with contouring and highlighting, and add a pop of color to your eyes and lips. Finish off with a setting spray to ensure your makeup lasts throughout the shoot. Remember, practice makes perfect, so don’t be afraid to experiment and find what works best for you!
Mastering the Art of Photoshoot Makeup
Photoshoots require careful attention to detail, and one of the most important elements is the makeup. A well-executed makeup look can enhance your features, create a flawless complexion, and make you feel confident in front of the camera. Whether you’re a model, a photographer, or just someone who wants to achieve a stunning look for a photoshoot, mastering the art of photoshoot makeup is essential. In this article, we will guide you through the steps and techniques to achieve a flawless and camera-ready makeup look for your next photoshoot.
Prepping Your Skin
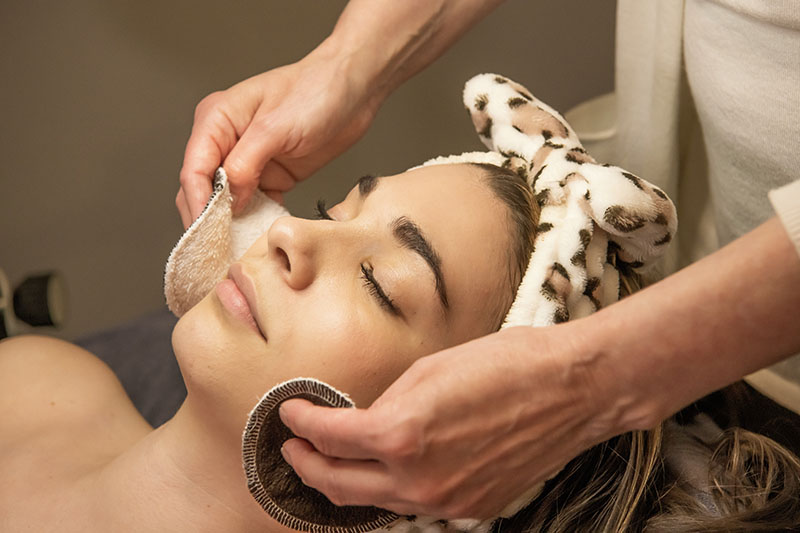
Before diving into the makeup application, it’s important to prep your skin for the photoshoot. This step ensures that your makeup applies smoothly and lasts longer. Here are some prepping tips:
- Cleanse your face with a gentle cleanser to remove any dirt or oil.
- Apply a hydrating moisturizer to provide a smooth base for makeup application. Allow it to fully absorb into the skin.
- Apply a primer to further smooth out your skin’s texture and help your makeup last longer.
- Don’t forget to moisturize your lips with a lip balm to prevent dryness.
Creating a Flawless Base
Creating a flawless base is the key to any makeup look, especially for a photoshoot. Follow these steps to achieve a flawless complexion:
1. Choose the Right Foundation: Select a foundation that matches your skin tone perfectly. Apply a small amount of foundation onto the back of your hand, and using a brush or sponge, blend it onto your skin in circular motions for an even application.
2. Conceal Any Imperfections: If you have blemishes or dark circles, apply a concealer that matches your skin tone to the areas that need extra coverage. Blend well with a brush or sponge.
3. Set with Powder: To prevent your makeup from smudging or creasing, set your foundation and concealer with a translucent powder. Use a fluffy brush to lightly dust the powder all over your face.
4. Add a Natural Flush: Apply a soft blush to the apples of your cheeks to add a natural flush of color. Smile and blend the blush upward towards your temples.
Accentuating the Eyes
When it comes to photoshoots, the eyes are often the focal point. Here’s how to accentuate your eyes for a captivating look:
1. Prime Your Eyelids: Apply an eyeshadow primer to create a smooth base for your eye makeup. This helps to prevent creasing and makes your eyeshadow colors more vibrant.
2. Define Your Eyebrows: Fill in your eyebrows using an eyebrow pencil or powder that matches your natural hair color. Create small, hair-like strokes to mimic the appearance of natural brows.
3. Apply Eyeshadow: Choose eyeshadow colors that complement your eye color and the overall look you want to achieve. Apply a lighter shade on your eyelids as a base, then blend a darker shade into the crease to add depth.
4. Line and Define: Use an eyeliner to define your lash line. You can create a thin line for a subtle look or go for a more dramatic winged liner. Don’t forget to curl your lashes and apply mascara for added length and volume.
Enhancing the Lips
Your photoshoot makeup won’t be complete without enhancing your lips. Here’s how to achieve a stunning lip look:
1. Exfoliate: Use a lip scrub or gently brush your lips with a toothbrush to remove any dry skin. This creates a smooth canvas for your lip products.
2. Apply Lip Liner: Outline your lips with a lip liner that matches your chosen lip color. This helps to define the shape and prevent your lip color from bleeding.
3. Choose Your Lip Color: Select a lip color that complements your overall makeup look and the theme of the photoshoot. Apply the lipstick or lip gloss evenly, starting from the center and moving outward.
Setting Your Makeup
Setting your makeup is crucial to ensure that it stays in place throughout the photoshoot. Here are some tips:
1. Use a Setting Spray: Mist your face with a setting spray to lock in your makeup and extend its longevity. Hold the spray a few inches away from your face and spray in a circular motion.
2. Blot Away Excess Oil: If your skin tends to get oily, keep blotting papers or a matte powder on hand to absorb any excess oil that may appear during the photoshoot.
Lighting and Photo Test
Before stepping in front of the camera, it’s important to test how your makeup looks under different lighting conditions and in photos. Here’s what you can do:
1. Test in Natural Light: Step outside or near a window to see how your makeup looks in natural light. This will give you an idea of how it will appear in photos taken outdoors.
2. Take Test Photos: Use your phone or a camera to take test photos in different lighting setups, such as with flash or in dim lighting. This allows you to see how your makeup translates in photos and make any necessary adjustments.
Conclusion
Mastering the art of photoshoot makeup is all about creating a flawless base, accentuating the eyes, enhancing the lips, and setting your makeup for a long-lasting finish. By following the steps and techniques mentioned in this article, you’ll be able to achieve a stunning and camera-ready makeup look for your next photoshoot. Remember, practice makes perfect, so don’t be afraid to experiment and find what works best for you.
Key Takeaways for “how to do photoshoot makeup”
- Prep your skin by cleansing, moisturizing, and applying a primer to create a smooth canvas.
- Choose foundation and concealer that matches your skin tone and use a light hand to avoid a cakey look.
- Enhance your features with contouring and highlighting techniques to create definition and dimension.
- Opt for long-lasting and waterproof makeup products to withstand the heat and lights of the photoshoot.
- Finish off with a setting spray to lock in your makeup and touch up as needed throughout the shoot.
Frequently Asked Questions
Whether you’re preparing for a professional photoshoot or simply want to enhance your makeup skills, knowing how to do photoshoot makeup is essential. Here are some commonly asked questions and answers to help you achieve a flawless and camera-ready look.
1. What are the key differences between everyday makeup and photoshoot makeup?
When it comes to photoshoot makeup, there are a few key differences compared to everyday makeup. Firstly, photoshoot makeup needs to be more long-lasting to withstand the heat of studio lights and the demands of a lengthy shoot. Secondly, photoshoot makeup often requires more coverage to even out skin tone and hide imperfections under the high-definition camera lens. Finally, the makeup application techniques used for photoshoots are often more precise and detailed to ensure the makeup looks flawless on camera.
In contrast, everyday makeup is more focused on a natural and wearable look for daily activities. It doesn’t need to withstand the same conditions as photoshoot makeup, and the application techniques are usually simpler and quicker to achieve.
2. How can I prepare my skin for a photoshoot makeup?
Preparing your skin is crucial for a successful photoshoot makeup application. Start by cleansing your face thoroughly to remove any dirt, oil, or makeup residue. Follow with a gentle exfoliation to smooth the skin’s texture and create a flawless canvas for the makeup. After exfoliation, apply a hydrating moisturizer to plump and nourish the skin. Finally, don’t forget to apply a primer specifically designed for photoshoots. A primer helps to smooth out the skin’s surface, minimize pores, and create a long-lasting base for your makeup.
It’s also important to remember to drink plenty of water and get enough sleep in the days leading up to the photoshoot. This will help ensure your skin is well-hydrated and radiant, providing an ideal base for makeup application.
3. Which foundation and concealer should I use for photoshoot makeup?
Choosing the right foundation and concealer is essential for achieving a flawless look in photoshoots. Look for foundation formulas that offer medium to full coverage and have a matte or satin finish. The foundation should match your skin tone perfectly to avoid any noticeable lines or patches. Avoid foundations with SPF, as they can create a flashback effect under the camera flash.
When it comes to concealer, opt for a full-coverage formula that matches your foundation shade. Use it to hide any blemishes, dark circles, or areas of discoloration. Remember to blend the foundation and concealer seamlessly into your skin for a natural-looking finish.
4. How can I make my eyes stand out in photos?
To make your eyes stand out in photos, start by applying a neutral-toned eyeshadow as a base. Then, choose a slightly darker shade to define the crease and outer corner of the eye for added dimension. Next, apply eyeliner close to the lash line to enhance the shape of your eyes. You can also opt for false lashes or mascara to add volume and length to your lashes. Finally, don’t forget to groom and fill in your eyebrows to frame your eyes.
Using a highlighter on the inner corners of your eyes and on the brow bone can also help to brighten and open up the eyes in photos.
5. How can I make my lipstick last longer for a photoshoot?
To make your lipstick last longer during a photoshoot, start by exfoliating and moisturizing your lips to create a smooth canvas. Apply a lip liner in a shade that matches your lipstick or is slightly darker to define the shape of your lips and prevent feathering or bleeding.
Next, apply your lipstick using a lip brush for precise application. Blot your lips with a tissue, then apply a second layer of lipstick. To seal the color and prevent smudging, lightly dust your lips with translucent powder and reapply the lipstick. For added longevity, you can also use a setting spray specifically designed for the lips.
To create a photoshoot makeup look, follow these simple steps. Start by cleansing your face to remove any dirt or oil. Then, apply a moisturizer to hydrate your skin.
Next, use a primer to create a smooth base for your makeup. Apply foundation to even out your skin tone, and concealer to cover any blemishes or dark circles. Add a touch of blush to give your cheeks a natural flush.
For your eyes, use neutral eyeshadows to create a soft, natural look. Line your eyes with eyeliner and apply mascara to make them pop. Finally, choose a lip color that complements your overall look and finish with a setting spray to make your makeup last longer.
Remember, less is more when it comes to photoshoot makeup. Aim for a polished and natural look that enhances your features without appearing too heavy or overdone. With these simple steps, you’ll be ready for your next photoshoot!


Leave A Comment