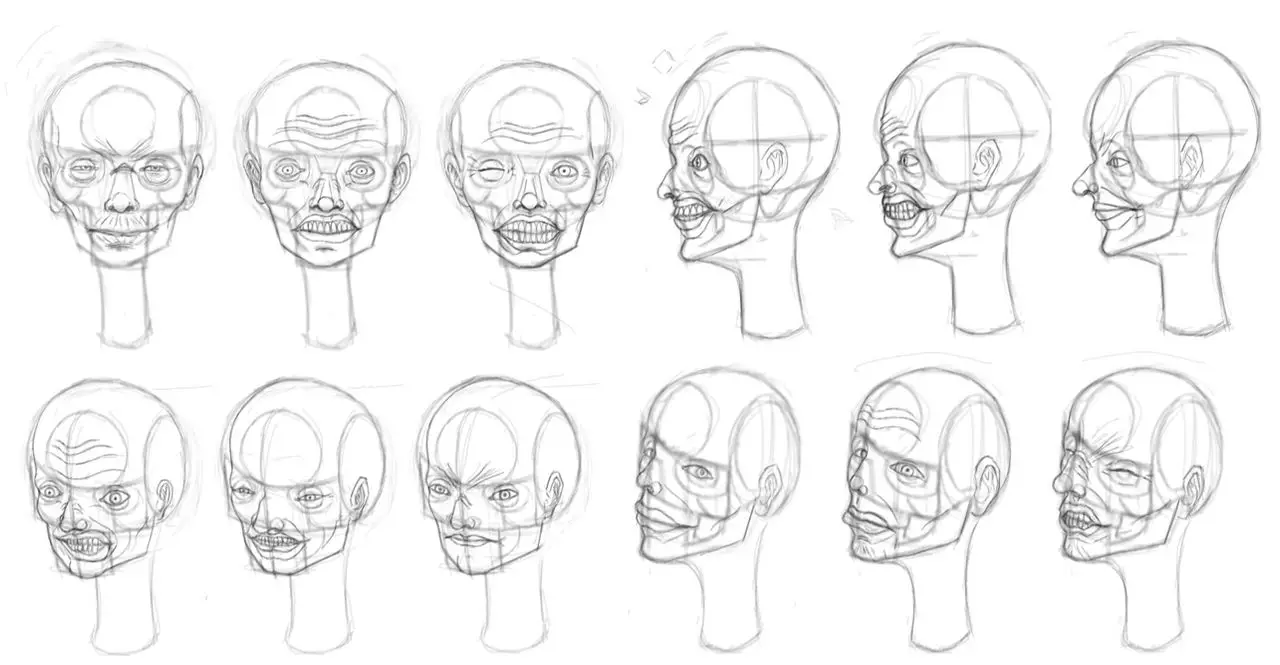
Creating realistic wrinkles on a face requires careful observation and attention to detail. Start by sketching the basic facial structure, then add lines and shading to indicate natural skin folds and creases. Study reference photos to understand how wrinkles form around the eyes, forehead, and mouth. Use a combination of light and dark lines to add depth and dimension. Remember to blend and soften the lines for a more realistic appearance. With practice, you’ll be able to capture the intricacies of facial wrinkles with confidence.
When it comes to capturing the realistic details of a face, drawing wrinkles can add depth and character to the overall portrait. Wrinkles are not just signs of aging; they also tell stories of a person’s life experiences. By masterfully rendering wrinkles on the face, an artist can bring a sense of wisdom and emotion to the artwork, evoking a connection with the viewer.
In order to draw wrinkles realistically, it is essential to understand the underlying structures of the face and how they change with age. By studying references and observing real-life faces, an artist can gain insights into the patterns, textures, and directions of wrinkles. Paying attention to the interplay between light and shadow can further enhance the three-dimensional effect of the wrinkles, adding depth and realism to the artwork. With practice and attention to detail, an artist can master the art of drawing wrinkles and create captivating portraits that resonate with viewers.


Understanding Wrinkles on the Face
Wrinkles are a natural part of the aging process and appear on the face as we get older. They are the result of the loss of collagen and elastin in the skin, which leads to a decrease in skin elasticity and volume. Wrinkles can also be caused by factors such as sun exposure, smoking, and repetitive facial movements. While many people view wrinkles as a sign of aging, they can also be seen as a reflection of a person’s life experiences and expressions.
When it comes to drawing wrinkles on the face, it’s important to understand the different types and characteristics of wrinkles. There are various types of wrinkles, including fine lines, deep wrinkles, and dynamic wrinkles. Fine lines are small, shallow wrinkles that often appear around the eyes and mouth. Deep wrinkles, on the other hand, are more pronounced and can be seen even when the face is at rest. Dynamic wrinkles are the result of repetitive facial movements and are usually seen in areas such as the forehead and around the mouth.
To accurately draw wrinkles on the face, it’s important to study and observe the facial features of your subject. Pay attention to the areas where wrinkles are more likely to appear, such as the forehead, between the eyebrows, and around the eyes and mouth. Notice the direction, length, and depth of the wrinkles to create a realistic depiction.
Using Makeup to Emphasize Wrinkles
Makeup can be a powerful tool when it comes to emphasizing and drawing wrinkles on the face. By using specific techniques and products, you can create the appearance of wrinkles and add depth and dimension to your makeup look. One technique is to use contouring and highlighting to mimic the natural shadows and highlights that occur on the face.
For example, to create the illusion of deep wrinkles on the forehead, you can apply a dark shade of powder or cream in the creases and blend it outwards. This creates a shadow effect that gives the appearance of depth. Additionally, you can use a lighter shade on the raised areas of the forehead to simulate natural highlights. This technique can be applied to other areas of the face as well, such as the smile lines and crow’s feet.
When using makeup to draw wrinkles on the face, it’s important to blend the products well and use a light hand. The goal is to create a natural-looking effect, so be mindful of not overdoing it. It’s also worth mentioning that using products specifically designed for creating wrinkles, such as special effects makeup or prosthetics, can also be a great option for achieving a realistic result.
Creating Wrinkles with Drawing Techniques
If you prefer drawing or painting, there are various techniques you can use to create wrinkles on the face. One technique is to use shading and hatching to create the illusion of depth and texture. Start by lightly sketching the basic outlines of the wrinkles, paying attention to their direction and shape. Then, use your preferred drawing medium to add shading and hatching to mimic the shadows and highlights.
Another technique is to use cross-hatching, which involves overlapping lines of varying thickness and direction. This technique is particularly effective in creating the appearance of fine lines and texture. Start by lightly sketching the lines in the desired areas and then gradually add more layers to build up the wrinkles. The key is to pay attention to the thickness and spacing of the lines to create a realistic effect.
When drawing wrinkles on the face, it’s important to observe and study reference photos or live subjects. Take note of the unique characteristics of wrinkles, such as their shapes, patterns, and spacing. Use these observations as a guide while creating your artwork and experiment with different techniques to achieve the desired effect.
Maintaining Realism and Balance
Whether you’re using makeup or drawing techniques to create wrinkles on the face, it’s essential to maintain a sense of realism and balance. Avoid over-exaggerating the wrinkles, as it can lead to a caricature-like appearance. Instead, focus on capturing the essence and character of the person’s face.
Additionally, consider the overall composition of your artwork or makeup look. Balance the presence of wrinkles with other elements to create a harmonious and aesthetically pleasing image. Remember that wrinkles are just one aspect of a person’s face and should be integrated into the overall depiction.
Conclusion
Drawing wrinkles on the face can be a challenging but rewarding process. Whether you’re using makeup or traditional drawing techniques, the key is to study and observe the unique characteristics of wrinkles and apply them in a way that enhances the realism and overall composition. Remember to maintain a sense of balance and avoid over-exaggeration. With practice and attention to detail, you can create realistic and convincing wrinkles on the face.

Frequently Asked Questions
Here are some commonly asked questions about drawing wrinkles on the face.
1. How do you draw natural-looking wrinkles on the face?
To draw natural-looking wrinkles on the face, you need to understand the anatomy of wrinkles and how they form on different parts of the face. Start by lightly sketching the overall shape of the face and identifying the areas where wrinkles would typically appear, such as around the eyes, on the forehead, and around the mouth. Use lightly curved lines to indicate the direction and shape of the wrinkles.
Next, add shading to create depth and volume. Determine the light source and imagine how it would interact with the skin. Use darker shading along the creases and lighter shading on the raised areas. Remember to blend the shading to avoid harsh lines and create a more realistic effect. Practice observing real-life wrinkles and studying reference images to improve your understanding of their appearance and placement.
2. Any tips for drawing wrinkles on different age groups?
When drawing wrinkles on different age groups, it’s important to consider the natural progression of wrinkles as a person ages. For younger individuals, wrinkles may be less pronounced and more subtle. Focus on fine lines and lightly etched wrinkles to convey a youthful appearance. As the age group progresses, wrinkles become more prominent and deeper.
For middle-aged individuals, emphasize both fine lines and deeper creases, especially around the eyes, forehead, and mouth. When drawing wrinkles on older individuals, amplify the depth and volume of the wrinkles, as well as the overall amount. Pay attention to the specific characteristics associated with age, such as crow’s feet, smile lines, and forehead wrinkles. Adapt your technique accordingly to capture the unique qualities of each age group.
3. Should I use different drawing techniques for different types of wrinkles?
Yes, different types of wrinkles require different drawing techniques to achieve a more accurate representation. For example, fine lines and surface wrinkles are best depicted using short, light strokes to create a delicate texture. Deep creases and folds, on the other hand, require longer, bolder lines to capture their depth.
Experiment with different drawing tools, such as fine-point pens or pencils, to achieve the desired effects. Additionally, consider the texture of the skin when drawing wrinkles. Smooth skin may have more subtle and delicate wrinkles, while rougher or aged skin may have more pronounced and rugged wrinkles. Adapting your technique to suit the specific type of wrinkle will help you create a more realistic portrayal.
4. How can I make the wrinkles look more three-dimensional?
To make wrinkles look more three-dimensional in your drawings, focus on understanding how light interacts with the skin. Identify the direction of the light source and use shading techniques to create highlights and shadows. Lightly shade the areas of the wrinkles that would be in shadow, and leave the raised areas lighter to represent highlights.
Pay attention to the contours of the face and how they influence the appearance of the wrinkles. Use cross-hatching or blending techniques to create subtle variations in tone and texture. This will add depth and dimension to your drawing, making the wrinkles appear more realistic and three-dimensional. Practice observing real-life light and shadow patterns to enhance your understanding of how they affect the appearance of wrinkles.
5. Any additional tips for drawing wrinkles on the face?
Here are some additional tips to consider when drawing wrinkles on the face:
– Study reference images and observe real-life wrinkles to improve your understanding of their appearance and placement.
– Experiment with different drawing techniques and tools to achieve a variety of effects.
If you want to draw wrinkles on a face, here’s how you can do it. Firstly, start by lightly sketching the basic facial features, such as the eyes, nose, and mouth.
Next, use short, curved lines to add the wrinkles. Focus on areas where wrinkles are commonly seen, like around the eyes, forehead, and mouth. Remember to make the lines lighter and less defined for a more natural look.


Leave A Comment