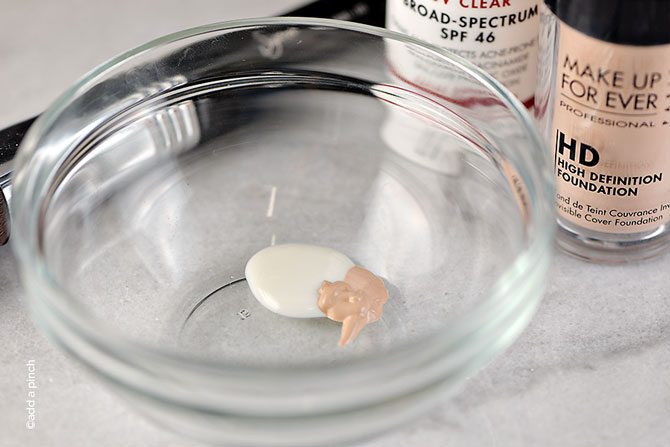
Are you tired of using multiple products to achieve a flawless complexion? Why not try making your own tinted moisturizer? It’s a simple and effective way to save time and money while still achieving a natural, glowing look. With just a few ingredients, you can create a customized tinted moisturizer that suits your skin tone perfectly.
To make your own tinted moisturizer, you will need a moisturizer of your choice and a foundation or concealer that matches your skin tone. Start by mixing a small amount of moisturizer with a pea-sized amount of foundation or concealer on the back of your hand. Blend the two products together until you achieve the desired shade. Then, apply the mixture to your face using clean fingers or a beauty blender, making sure to blend it evenly. The result is a lightweight and hydrating tinted moisturizer that provides coverage and moisture in one step.
Create your own tinted moisturizer with these simple steps. First, gather your ingredients: a moisturizer suitable for your skin type and a foundation that matches your skin tone. Next, mix a small amount of moisturizer and foundation together on the back of your hand until well blended. Apply the mixture evenly to your face using clean fingers or a makeup sponge. Finally, blend the tinted moisturizer into your skin for a natural and glowing finish. Voila! You now have a personalized tinted moisturizer.

How to Make Tinted Moisturizer
Tinted moisturizer is a versatile beauty product that combines hydration and color correction, giving your skin a natural and even-toned look. Whether you want to streamline your makeup routine or create a customized product, making your own tinted moisturizer is surprisingly easy. In this article, we will guide you through the process of making tinted moisturizer at home, allowing you to tailor it to your skin type and preference.
Step 1: Gather the Ingredients
The first step in making tinted moisturizer is to gather all the necessary ingredients. Here’s what you’ll need:
- A moisturizer suitable for your skin type
- A foundation or concealer that matches your skin tone
- A clean container or empty bottle to mix the ingredients
- A spatula or spoon for mixing
Step 2: Choose the Right Moisturizer
The key to a good tinted moisturizer is the base moisturizer you choose. Look for a moisturizer that suits your skin type – whether it’s oily, dry, or combination. Opt for a lightweight formula that blends easily and won’t clog your pores.
If you prefer a tinted moisturizer with SPF protection, you can choose a moisturizer that already has sun protection properties. Otherwise, you can apply a separate sunscreen before applying your tinted moisturizer.
Step 3: Mix in the Foundation or Concealer
The next step is to mix in a foundation or concealer that matches your skin tone. This will add a hint of color and provide coverage while still maintaining the moisturizing properties of the product.
Start with a small amount of foundation or concealer, and gradually add more as needed to achieve your desired level of coverage. Remember, it’s easier to add more color than to remove excess pigment, so start with a conservative amount and build up if necessary.
Use a spatula or spoon to mix the moisturizer and foundation together until they are well-blended. Make sure there are no streaks or clumps and the color is evenly distributed.
Step 4: Adjust the Consistency
If you find that your tinted moisturizer is too thick or heavy, you can adjust the consistency by adding a few drops of serum or moisturizer. This will make the product more lightweight and easier to blend into your skin.
Conversely, if your tinted moisturizer is too runny, you can thicken it by adding a small amount of loose setting powder. This will help the product adhere better to your skin and provide longer-lasting coverage.
Step 5: Store and Apply
Once you’re satisfied with the consistency and color of your homemade tinted moisturizer, transfer it to a clean container or empty bottle for storage. Make sure the container is airtight to prevent the product from drying out.
To apply your tinted moisturizer, start with clean and moisturized skin. Use your fingers, a sponge, or a brush to apply the product evenly all over your face, blending it into your skin for a seamless finish. You can build up the coverage by applying additional layers if desired.
Step 6: Additional Tips and Tricks
Here are a few additional tips and tricks to enhance your tinted moisturizer experience:
- You can customize your tinted moisturizer by adding a drop of liquid highlighter for a subtle glow or a few drops of facial oil for extra hydration.
- Remember to shake or mix your tinted moisturizer well before each use to ensure the ingredients are properly blended.
- If you have specific skin concerns, such as redness or dark spots, you can mix in a color corrector before adding the foundation or concealer to address those issues.
- Experiment with different ratios of moisturizer and foundation/concealer to find the perfect balance that suits your skin tone and preference.
Can I Use Tinted Moisturizer Every Day?
Yes, you can use tinted moisturizer every day as part of your everyday makeup routine. In fact, many people prefer using tinted moisturizer over traditional foundation for a more natural and lightweight look.
Tinted moisturizer provides a subtle hint of color while hydrating and protecting your skin. It’s a great option for those who want to even out their skin tone and achieve a dewy, fresh-faced appearance.
Unlike heavy foundations, tinted moisturizers allow your skin to breathe and don’t clog your pores. They provide a light coverage that evens out minor imperfections without feeling heavy or cakey.
Key Takeaways
- Blend a small amount of foundation with your regular moisturizer to make your own tinted moisturizer.
- Adjust the ratio of foundation to moisturizer based on your preferred level of coverage.
- Choose a foundation shade that matches your skin tone for the most natural-looking result.
- Apply the tinted moisturizer evenly to clean, moisturized skin using your fingers or a makeup sponge.
- Set the tinted moisturizer with a light dusting of translucent powder for a longer-lasting finish.
Frequently Asked Questions
This section provides answers to commonly asked questions about making tinted moisturizer.
1. Can I make my own tinted moisturizer at home?
Yes, you can make your own tinted moisturizer at home. All you need is a moisturizer and a foundation that matches your skin tone.
To make your tinted moisturizer, simply mix a small amount of foundation with your moisturizer in a clean container. Start with a 1:1 ratio and adjust as needed to achieve your desired level of coverage. Blend the mixture well and apply it to your face as you would with regular moisturizer.
2. What are the benefits of using tinted moisturizer?
Tinted moisturizer offers several benefits for your skin:
First, it provides light coverage to even out your skin tone, giving you a natural-looking complexion. This is especially useful for those who prefer a more subtle makeup look or want to simplify their beauty routine.
Second, tinted moisturizer combines the benefits of both moisturizer and foundation. It hydrates your skin, keeping it nourished and moisturized, while also providing some coverage for blemishes or imperfections.
3. Can I customize the coverage level of my tinted moisturizer?
Yes, you can customize the coverage level of your tinted moisturizer based on your preferences.
If you prefer a sheer coverage, use less foundation when mixing it with your moisturizer. This will give you a more natural, lightweight finish that allows your skin to breathe.
If you want more coverage, simply add a bit more foundation to the mixture. You can experiment with different ratios until you achieve the desired coverage level.
4. How long does homemade tinted moisturizer last?
The shelf life of homemade tinted moisturizer is usually the same as the moisturizer you use as a base.
However, it’s important to note that since you’re adding foundation to the moisturizer, it may slightly affect the stability and longevity of the product. To ensure the freshness and effectiveness of your homemade tinted moisturizer, it’s recommended to use it within 6-12 months.
5. Can I use tinted moisturizer on all skin types?
Tinted moisturizer is generally suitable for all skin types, but it’s important to choose the right formula for your specific needs.
If you have oily or combination skin, look for oil-free or mattifying tinted moisturizers. These formulas help control excess oil and shine throughout the day.
For dry or mature skin, opt for hydrating tinted moisturizers that provide extra moisture and nourishment.

How to Make Tinted Moisturizer with Liquid Foundation | Quick & Simple Steps
To make tinted moisturizer, start by mixing your favorite moisturizer with a liquid foundation.
Use equal parts of each and blend them together in a small bowl or the palm of your hand. Apply the mixture to your face using clean fingers or a cosmetic sponge, blending it in evenly for a natural finish. You can adjust the color intensity by adding more foundation or moisturizer as needed. Set the tinted moisturizer with a light dusting of loose powder for a long-lasting effect. Remember to choose a foundation shade that matches your skin tone for the best results. Enjoy your homemade tinted moisturizer!


Leave A Comment