Whether you’re a professional makeup artist or just looking to add some special effects to your costume, liquid latex is a versatile and essential tool. It’s a product that can transform your appearance, allowing you to create realistic scars, wounds, and other special effects. But do you know the best way to use liquid latex to achieve professional-looking results? Let’s dive in and explore the tips and tricks of using this magical makeup product.
Liquid latex has a rich history in the world of special effects makeup. Originally developed for use in the theater and film industry, it has become popular among professional makeup artists and enthusiasts alike. Its versatility and durability make it a go-to product for creating realistic prosthetics and special effects. With its ability to adhere to the skin and dry to a flexible finish, you can easily mold it into different shapes and textures. Whether you want to create lifelike wounds or add dimension to your cosplay costume, liquid latex is your solution. So go ahead, unleash your creativity, and let liquid latex elevate your makeup game.
Looking to use liquid latex? Follow this step-by-step guide to get started. First, clean and dry the area where you’ll be applying the liquid latex. Next, apply a thin layer using a brush or sponge. Let it dry completely, then repeat with additional layers for desired thickness. Once dry, you can paint over or peel off the latex for special effects. Remember to moisturize your skin afterwards for extra care. Enjoy experimenting with liquid latex in your artistic endeavors!

How to Use Liquid Latex
Liquid latex is a versatile material that has various applications in the world of art, special effects, and crafting. Whether you want to create realistic wounds, mold objects, or make intricate designs, liquid latex can be a valuable tool. But how exactly do you use liquid latex? In this guide, we’ll explore the step-by-step process and provide tips for getting the best results.
Step 1: Prepare the Surface
Before applying liquid latex, it’s important to prepare the surface. Ensure that the area is clean and dry, free from any oils, dirt, or debris. If you’re working on your skin, it’s a good idea to cleanse and moisturize beforehand. This will help the liquid latex adhere better and create a smoother finish.
Step 1.1: Use a Barrier
If you’re applying liquid latex directly on your skin, it’s recommended to use a barrier to prevent any potential irritation. Apply a thin layer of petroleum jelly or a specialized latex barrier product on the areas surrounding where you’ll be working. This will make the removal process easier and protect your skin.
Step 2: Apply the Liquid Latex
Now that the surface is prepped, it’s time to apply the liquid latex. Depending on your project, you can use a brush, sponge, or even your fingers to apply the latex. Start with a thin layer and gradually build it up for a more substantial effect.
Step 2.1: Drying Time
Allow each layer of liquid latex to dry completely before applying the next one. The drying time will vary depending on the thickness of the layer and environmental factors like temperature and humidity. Generally, it takes about 5-15 minutes for each layer to dry. You can use a hairdryer on a low setting to speed up the process, but be careful not to overheat the latex.
Step 3: Creating Effects or Molding
Once the desired number of layers has been applied, you can start getting creative with liquid latex. If you’re aiming to create special effects like wounds or scars, you can use various tools to shape the latex, such as sculpting tools, toothpicks, or cotton swabs. Additionally, you can apply makeup on top of dried latex to further enhance the effect.
Step 4: Removal Process
After you’re done with your liquid latex creation, it’s time to remove it. Gently peel off the latex from your skin or the surface. If needed, you can use a makeup remover or a special latex remover to make the process easier. Take care not to pull too hard to avoid any discomfort or skin irritation.
Tips for Using Liquid Latex
- Experiment with different thicknesses of liquid latex to achieve different effects.
- Try adding colorants or pigments to the latex before applying for a unique look.
- If you make any mistakes during the application, you can gently remove the latex with a cotton swab dipped in water.
- Make sure to store liquid latex in a cool, dry place to prolong its shelf life.
- When working with liquid latex, it’s advisable to work in a well-ventilated area as the fumes can be strong.
| Pros | Cons |
|---|---|
| Flexible and stretchy | Can cause skin irritation in some individuals |
| Easy to apply and remove | Not suitable for people with latex allergies |
| Allows for realistic special effects | May require multiple layers for desired effect |
Why Choose Liquid Latex?
Liquid latex offers a wide range of benefits that make it a popular choice among artists, special effects enthusiasts, and crafters. Here are a few reasons why you should consider using liquid latex:
Realistic Effects
One of the biggest advantages of liquid latex is its ability to create realistic effects. Whether you’re aiming for wounds, scars, or textures, liquid latex can provide the desired result. Its stretchy and flexible nature allows it to mimic the appearance of skin, making it ideal for special effects makeup or theatrical productions.
Versatility
Liquid latex is incredibly versatile and can be used for various applications. It can be molded, shaped, and sculpted to create intricate designs or objects. Additionally, it can be used as a barrier for body painting or as a protective coating for foam props. The possibilities are endless!
Ease of Use
Another reason to choose liquid latex is its ease of use. It can be applied with brushes, sponges, or even your fingers. The drying time is relatively quick, and the latex can be easily removed by peeling it off. This makes it a convenient option for both beginners and experienced users.
Key Takeaways: How to Use Liquid Latex
- Start by cleaning and preparing your skin.
- Apply a thin layer of liquid latex using a brush or sponge.
- Allow the latex to dry completely before moving or stretching your skin.
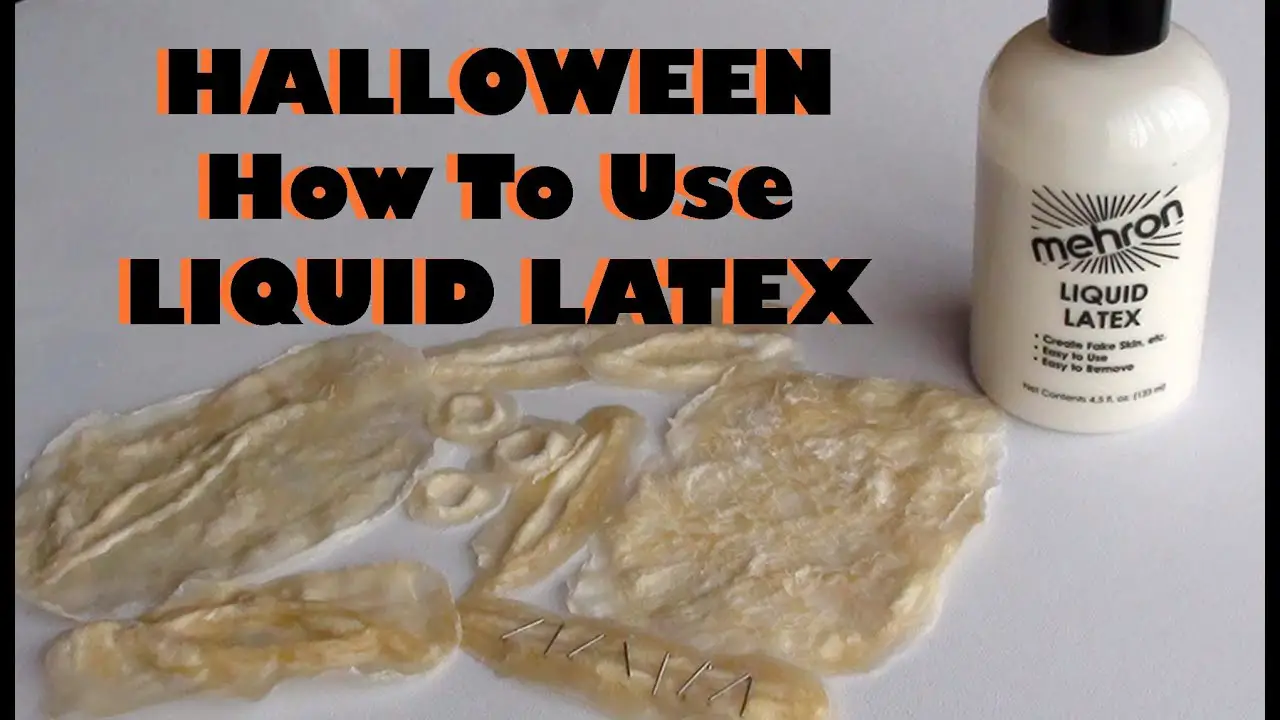
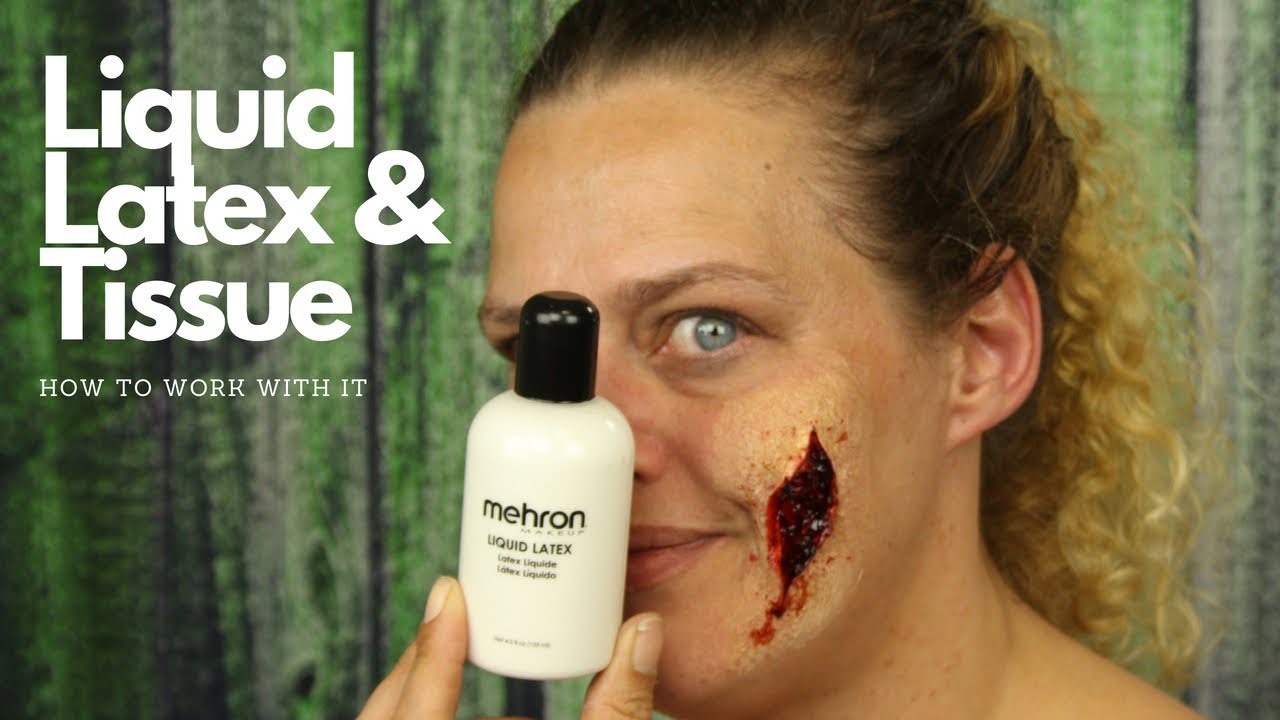
- To create texture, use tools like sponges, brushes, or tissue paper.
- Remove the latex by gently peeling it off from the edges.
Frequently Asked Questions
Welcome to our FAQ section on how to use liquid latex. Below, you will find answers to common questions related to the application and removal of liquid latex. Whether you are a makeup artist or a hobbyist, this guide will help you navigate the process with ease.
1. What is the best way to apply liquid latex?
To apply liquid latex, start by thoroughly cleaning and moisturizing the skin. Next, use a foam sponge or a brush to apply a thin and even layer of liquid latex to the desired area. Allow the first layer to dry completely before applying additional layers. For intricate designs or texture, you can use a stipple sponge or a small brush. Make sure to let each layer dry before proceeding to the next one. Once you have achieved the desired thickness, you can continue with your makeup or special effects application.
When working around the hairline or eyebrows, it is recommended to apply a thin layer of petroleum jelly beforehand to make the removal process easier. Additionally, remember to avoid applying liquid latex to hairy areas, as it may cause discomfort during removal.
2. How can I create realistic wounds or special effects using liquid latex?
Liquid latex is a versatile product that can be used to create realistic wounds, scars, and special effects. To achieve these effects, start by applying liquid latex to the desired area and allowing it to partially dry. Once it reaches a tacky consistency, you can manipulate it using tools like cotton swabs, toothpicks, or tweezers to create texture and shape. You can also add additional layers of liquid latex to build up the desired effect. Once the latex is fully dry, you can apply makeup or blood to enhance the realism of the effect. Remember to always test the makeup or blood on a small patch of latex before applying it to the entire area.
For more complex effects, such as prosthetics or 3D appliances, consider using a mold or sculpting tools to create the desired shape. Pour or brush liquid latex into the mold and let it dry before removing it. Then, apply the latex piece to the skin using liquid latex or a suitable adhesive.
3. What is the recommended method for removing liquid latex?
To remove liquid latex, start by gently peeling off the edges of the latex and gradually work your way towards the center. If you encounter any resistance, apply a small amount of baby oil or an adhesive remover to help loosen the latex. Avoid pulling or tugging forcefully, as this can irritate the skin. Once the latex is removed, clean the area with soap and water to remove any remaining residue.
If you have applied liquid latex to your eyebrows or hairline, it is recommended to remove it by soaking a cotton ball or pad in baby oil and gently rubbing it over the latex until it dissolves. Rinse the area with water and cleanse with soap to remove any traces of oil.
4. How long does liquid latex take to dry?
The drying time of liquid latex depends on several factors, including the thickness of the applied layers and the ambient temperature and humidity. In general, a thin layer of liquid latex will dry within 5 to 10 minutes, while thicker layers may take up to 30 minutes or more to dry completely. It is advisable to wait until each layer is fully dry before proceeding with additional layers or makeup application.
Keep in mind that drying times can be affected by environmental conditions, such as high humidity or cold temperatures. If you need to speed up the drying process, you can use a hairdryer set to a cool or low heat setting to gently accelerate the evaporation of moisture.
5. Can liquid latex cause skin reactions or allergies?
While liquid latex is generally safe to use, some individuals may experience skin reactions or allergies. It is always recommended to perform a patch test on a small area of skin before applying liquid latex to larger areas. Apply a small amount of liquid latex to the inner arm and leave it on for 24 hours to see if any adverse reactions occur. If you experience redness, irritation, or itching, remove the latex immediately and avoid further use.
If you have a known latex allergy or sensitivity, it is best to avoid using liquid latex altogether. Instead, consider alternative products that are latex-free and specifically designed for skin applications.
How to Use Liquid Latex
To use liquid latex, start by ensuring your skin is clean and dry. Apply a thin layer of moisturizer or petroleum jelly to protect your skin. Using a sponge or brush, apply the liquid latex in thin layers, allowing each layer to dry before applying the next. You can also use a hairdryer on a low setting to speed up the drying process. Once dry, you can use makeup or body paint to create desired effects. To remove the liquid latex, gently peel it off from the edges, taking care not to pull your skin.
Remember to avoid applying liquid latex close to your eyes, in your mouth, or on open wounds. If you experience any irritation or allergic reactions, stop using it immediately. Store liquid latex in a cool, dry place and avoid exposing it to extreme temperatures. With proper application and removal, liquid latex can be a fun and versatile tool for creating various special effects in makeup and body art.


Leave A Comment